Saturday, July 27, 2013

Crafts and Dolls: Boho-chic Style Top and Pants for a Blythe doll

This time I sew a top and a pants using Blythe doll as my measurement reference.  I referred the pants pattern from the one shared at www.puchicollective.com but I have to re-draw and measure it since I don't have a printer.  I like the pattern since it's perfect for the style concept I'm trying to achieve.
Here is Abbey (ABE custom) wearing the outfit.  The top is like a wrap and the pants is flare. Everything is hand-stitched.
 I'm enjoying hand embroidery.  It's a little time consuming but it's nice because it makes the accent unique.
I remembered having and wearing a pair of pants like this, with embroidery and bead works.  Also, this reminded me of "Jazz up your Levi's" during the 90's.  So you might have an idea how old I am right now... :)
Then to complete the look, I crocheted a headband using a psychedelic colored yarn matching the color scheme of the top.
Thanks for viewing and have a beautiful weekend!

Monday, July 22, 2013

Crafts and Dolls: Boho Chic Outfit for a Blythe doll

Here is the outfit I made using the custom lace I did a few days ago...  Everything is hand-stitched since I still don't have a sewing machine.  But I much like it especially working on with the details.  My theme for this and for my upcoming projects will be Bohemian Chic/Boho-chic style.  I also find it cute and cool especially on a Blythe doll.
Genevieve (Alexis Emerald) is wearing a Boho-chic themed outfit


I crocheted a belt and made a vest to match the dress


I did a hand embroidery on the vest following the same design of the custom lace.
Then I made a crocheted headband to complete the look.
Here is the dress without the vest and belt.
More to come...
Thank you so much and have good day!

Saturday, July 20, 2013

Sewing: Custom Lace with Simple Hand Embroidery

Finding the right piece for a project could be a challenge especially when you're trying to achieve a particular result in your mind.  As for me, I'm trying to find the right cotton lace for my next project in shops here but I couldn't and I also have a limited budget so I can't go for the costly ones.  Instead, I decided to make my own cotton lace using basic sewing tools and simple hand-embroidery stitches.
First, I prepared my fabric by measuring (1 1/2" x 12" base) and did the scalloped edge.  Since, I left my drafting tools way back home, I borrowed my son's play money coins to make each scallop even.  I applied Fray Check around the base after cutting the excess fabric and let it dry for a bit.  (Note:  Always test bonds on a small piece of your scrap fabric similar to the one your working with before application, just to be sure it will not do anything bad on your project.)
Then, I drew my pattern at the back of the fabric using the same play coins and ruler, before I started making the embroidery. Here are the hand embroidery stitches I used - blanket stitch, back stitch, french knot and lazy daisy.
Finally, I have my own custom cotton lace which I'll be using for my next project.
 Thank you very much and a good weekend to every one!

Thursday, July 18, 2013

Crafts and Dolls: Still Enjoying Sewing Summer Dresses

I got inspired making other dresses using denim fabric with crocheted matching headbands after I made the dress for my dolly friend.
Here is the first one... It's a chic dress in red, white and blue.  The special part of this dress was working on the hand embroidery at the bottom of the skirt, which I really love.  Then I crocheted a matching headband with the same color scheme to complete the look.
The next one is a cute and simple empire cut dress in pink, blue and green.  I added a cotton lace at the bottom to make it more girly.  Then I made a crocheted headband to match the dress.
So, these are my accomplishments for the past few days...  Good night and thank you!

Monday, July 15, 2013

Crafts and Dolls: Sewing a Summer Dress for a Blythe doll

I made a promise to my dolly friend that I will make some clothes for her girls.  I started making the doll clothes last month and here is another one for her...
It's a simple summer dress with a crocheted headband to match the dress.  I just love the simple lines and the mixture of denim and eyelet fabric with a few touch of red accents to liven-up the whole look.  
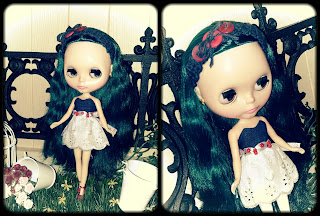
Here is my Genevieve (Alexis Emerald) modelling the dress
 Simple and sweet
A closer look of the dress
Thank you very much for viewing and enjoy Summer!

Friday, July 12, 2013

Handmade Card: Summer Fun with You

I made this card with few craft tools and simple techniques to maximize the use of pattern papers.
Summer Fun with You
This card is for my husband who'll be coming home soon...
I measured and draw my paper pieces then cut them using a pair of scissors and a basic hand-held cutter.  The flower and flourish were graphics I also cut from patterned paper.  I inked the edges of each pieces using markers for depth.  Good thing I brought a few rubber stamps with me, especially those given to me and my favorites I've collected,  I was able to use it on this card.  Sorry, I forgot the name of the stamp set.  I colored the hand-stamped image with markers and cut the excess paper leaving a few border around the image.
Here is the card with the layers of papers glued on it.  Since I don't have a foam tape, I made use of a packaging stiffener similar with a carton box material and cut it into small squares to mount the graphics with glue on my card (recycling)...
...this gave the layout depth and volume.  I made the flower using layers of hand-cut papers similar to what we did when we were young by folding circles into pies and cutting the edges/corners to make either snowflakes or flowers.  Then to form it, I used the same technique I learned when I made my layout for The Color Room.  Finally, I added the buttons, yarn string and ribbon.
The wordings were part of the design.
I draw the sun and made doodles of letters for the wordings.  The boat is also part of the rubber stamp set.
Materials:  Patterned papers from Authentique Paper, My Mind's Eye "Lost & Found" and "Miss Caroline", Rubber stamps, Inkadinkado double-tip stamp ink, Zig Writer pen, Letraset AquaMarker, Marvy Brush marker, adhesive, packaging stiffener/carton, assorted buttons, trimmings and basic craft tools.

Thank and happy crafting!

Wednesday, July 10, 2013

Encouraging My Little One to Create

Last February of this year, my son experience to share Valentines with his class.  A name list of their class were given to each student a week ahead giving them enough time to prepare their Valentines for the special day.  Usually, it's easy to buy ready-made Valentines in stores here, even at the dollar store it's available but, for me, it's much meaningful and special if it's made.
 I selected an easy to use, cut-and-paste materials so I can encourage my son to help me make the cards.
I did the simple layout and he did his part by adding stickers and writing on his Valentines. 
All done and ready to share...
On that day, he went home and was so excited to open his bag filled with Valentines from his classmates...
...and it's also nice that their teacher got them into crafts as well by painting on big hearts for their families.

Teaching young minds to work on simple things will help them get creative and work on complex tasks in the future.

Tuesday, July 9, 2013

Crafts and Dolls: Following Tutorials to make Brushed Yarn Wig for Erin (Lati doll Coco Green)

Meet Erin, she is a Lati "Coco" Green doll .  She is a ball-jointed-doll  (BJD) and has a beautiful innocent face just like a child.  I adopted her from a good dolly friend with her fantasy hair colored wig with fringe.
She is really cute and pretty with her soft pink wig but I've always wanted to change her wig and give her a much neutral hair color.  The thing is that it would be untimely for me to buy wigs online because it will cost me much especially paying for the shipping and other charges just to reach me here.  Glad that I have found tutorials to make wigs out of 100% acrylic yarns on the net.  I did this for almost a month given that I have to handle a lot of things for our son and our home.

Here it goes...

1.  Antique Lilac to make the wig cap by crocheting.  (Note: the tutorial is for a size 6 doll wig, Erin's wig should be size is 6.5 at least to 7, so I just used the hook size depending on the yarn gauge I used) 
Here is Erin with her finished crocheted wig cap.  This is the base of her wig.  The grids formed were a nice guide in sewing the wefts.
A closer look of the wig cap.

2.  The Manor to make the wefts with yarn.  I would say "Amazing!" because it was really cool and I love the result.  I love that after doing all the process you can still comb the wig without losing so much fiber which, for me, is really good because the wig will last longer.  It involves a lot of patience to work on this.  Maybe that's the exciting part of it, anticipating the result.  I took photos of each step I did because I made use of some alternatives since I don't have same tools on the tutorial.  Please visit the tutorial page, given in 3 parts, for the complete tips and guides. 
I followed how the weft is done on the tutorial.  It is really good to work on it by section since it will give you a good result.  But here, I used 2 yarn colors in brown and paprika because I like hair streaks (though, I don't have it on my hair).
The difference is that I made use of a low heat craft iron since I don't have a hair straightening iron.  I did a couple of quick glides on both sides just to be sure that the material will not melt.
Here is my first finished weft and this is just for the first layer.  All in all, I did this 3 times just to fill the whole wig cap with wefts. There goes the "being patient part" too. 
After sewing all the wefts on the wig cap, I also side-parted it.  Here you can see gaps which will be covered by the final weft which was also thought on the tutorial.
This is the final weft to cover the gap.

Now, here is Erin with her new wig and a pretty top made by Dollyheaven...   I love it but it will take me some time to make again for her because I have to recharge... lol...  Thanks to these 2 wonderful tutorials and cheers for sharing creativity!
I'll be sharing more photos of Erin on my facebook page. Thank you for viewing!

Monday, July 8, 2013

Dolls: Summer Time

Since it's Summer, I've got some time to pay attention with the 2 girls I was able to bring along.  I left the rest of my collections at home and will have to wait until we are ready to sent everything here.
I did a couple of fun shots...
 Abbey (ABE custom)
Genevieve (Alexis Emerald)

Going back to my old projects, I would also like to share this...
I did this last year, a few months before moving.  I wanted to give Abbey a touch-up since I'll be also  leaving most of my craft supplies home.  I know that it won't be that quick for me to have as much supplies here as I did home.
Here, I tried to put on make-up on my custom ABE Blythe doll, Abbey.  I followed tips and guides from tutorials found on the internet using chalk pastels for her eye shadow and blush, and acrylic paints for her lips. Honestly, I had a hard time doing her eye shadow since I did this without opening and removing the head from her body since I am scared that I might not be able to put everything back properly.  But one thing I love about this is painting on her lips, I love the half-smile shape.  All in all, it wasn't perfect but I sure did have a lot of fun trying!

Thanks and have a great day!  More photos on my facebook page.

Sunday, July 7, 2013

A Trip Down Memory Lane

Hi there!  As I was doing my best to retrieve photos of my previous blog entries for this page, I was also brought back to remember my past craft works and I would like to share some of my favorites.

It's been a year and still enjoying it, Sewing...  I became interested with sewing when I started collecting Sylvanian Families.  Just like dolls most collectors love dressing up their figures with custom outfits.  Then just recently I turned my interest  to my dolls and started making for them as well.

Sewing for my dolls and some for my dolly friends
Blythe Dolls
Kelly Dolls
Sylvanian Families

While collecting this cute critter figures, I also got myself into working on some makeshift spaces for them.  On these projects, I have mixed original Sylvanian Families miniatures with my Re-ments.
Country Boutique Project (my top favorite this type)
Pastry Shop/Shoe Shop
Minnie's Cake Shop

In the past years, I've been so much in to paper crafts.  I love making scrapbook pages, cards and other decorating projects using papers.
Traditional Layouts for The Color Room
My favorite digital layout using the Shabby Princess digital kit
Pop-up Piano Card
Pop-up St. Patrick's Day Card
Cards for Swap
My son's first birthday invitation cards
Altered cellphone box using paper diecuts and emboss
Altered pen holder using Washi tapes I bought from Hey Kessy
Inchies of Me (mixed media)
Inchies are art works made to fit a 1"x1" size canvass or plain
Photo Explosion Box of my son's first 12 months
Mini-Albums using patterned papers and hand-stamped Stamping Bella images
Decorating wood photo frames with paper craft embellishments

Lastly, I also recalled that I had a great time doing some crafts with my sisters and friends, Beading and Crochet.
This my favorite necklace project using chunky beads and ribbons
A bracelet watch I gave to my mom
A crocheted headband with flowers
A crocheted hats for dolls

So, that's it for now.  If you like to see more about these you may visit my facebook page.  Thank you and have great week ahead!